In the Business Since 2008
The Countertop Process
Intro
TimelineThis guide is the text version of the video above, presenting the full templating process in a clear, chronological walkthrough.
Drag to pan
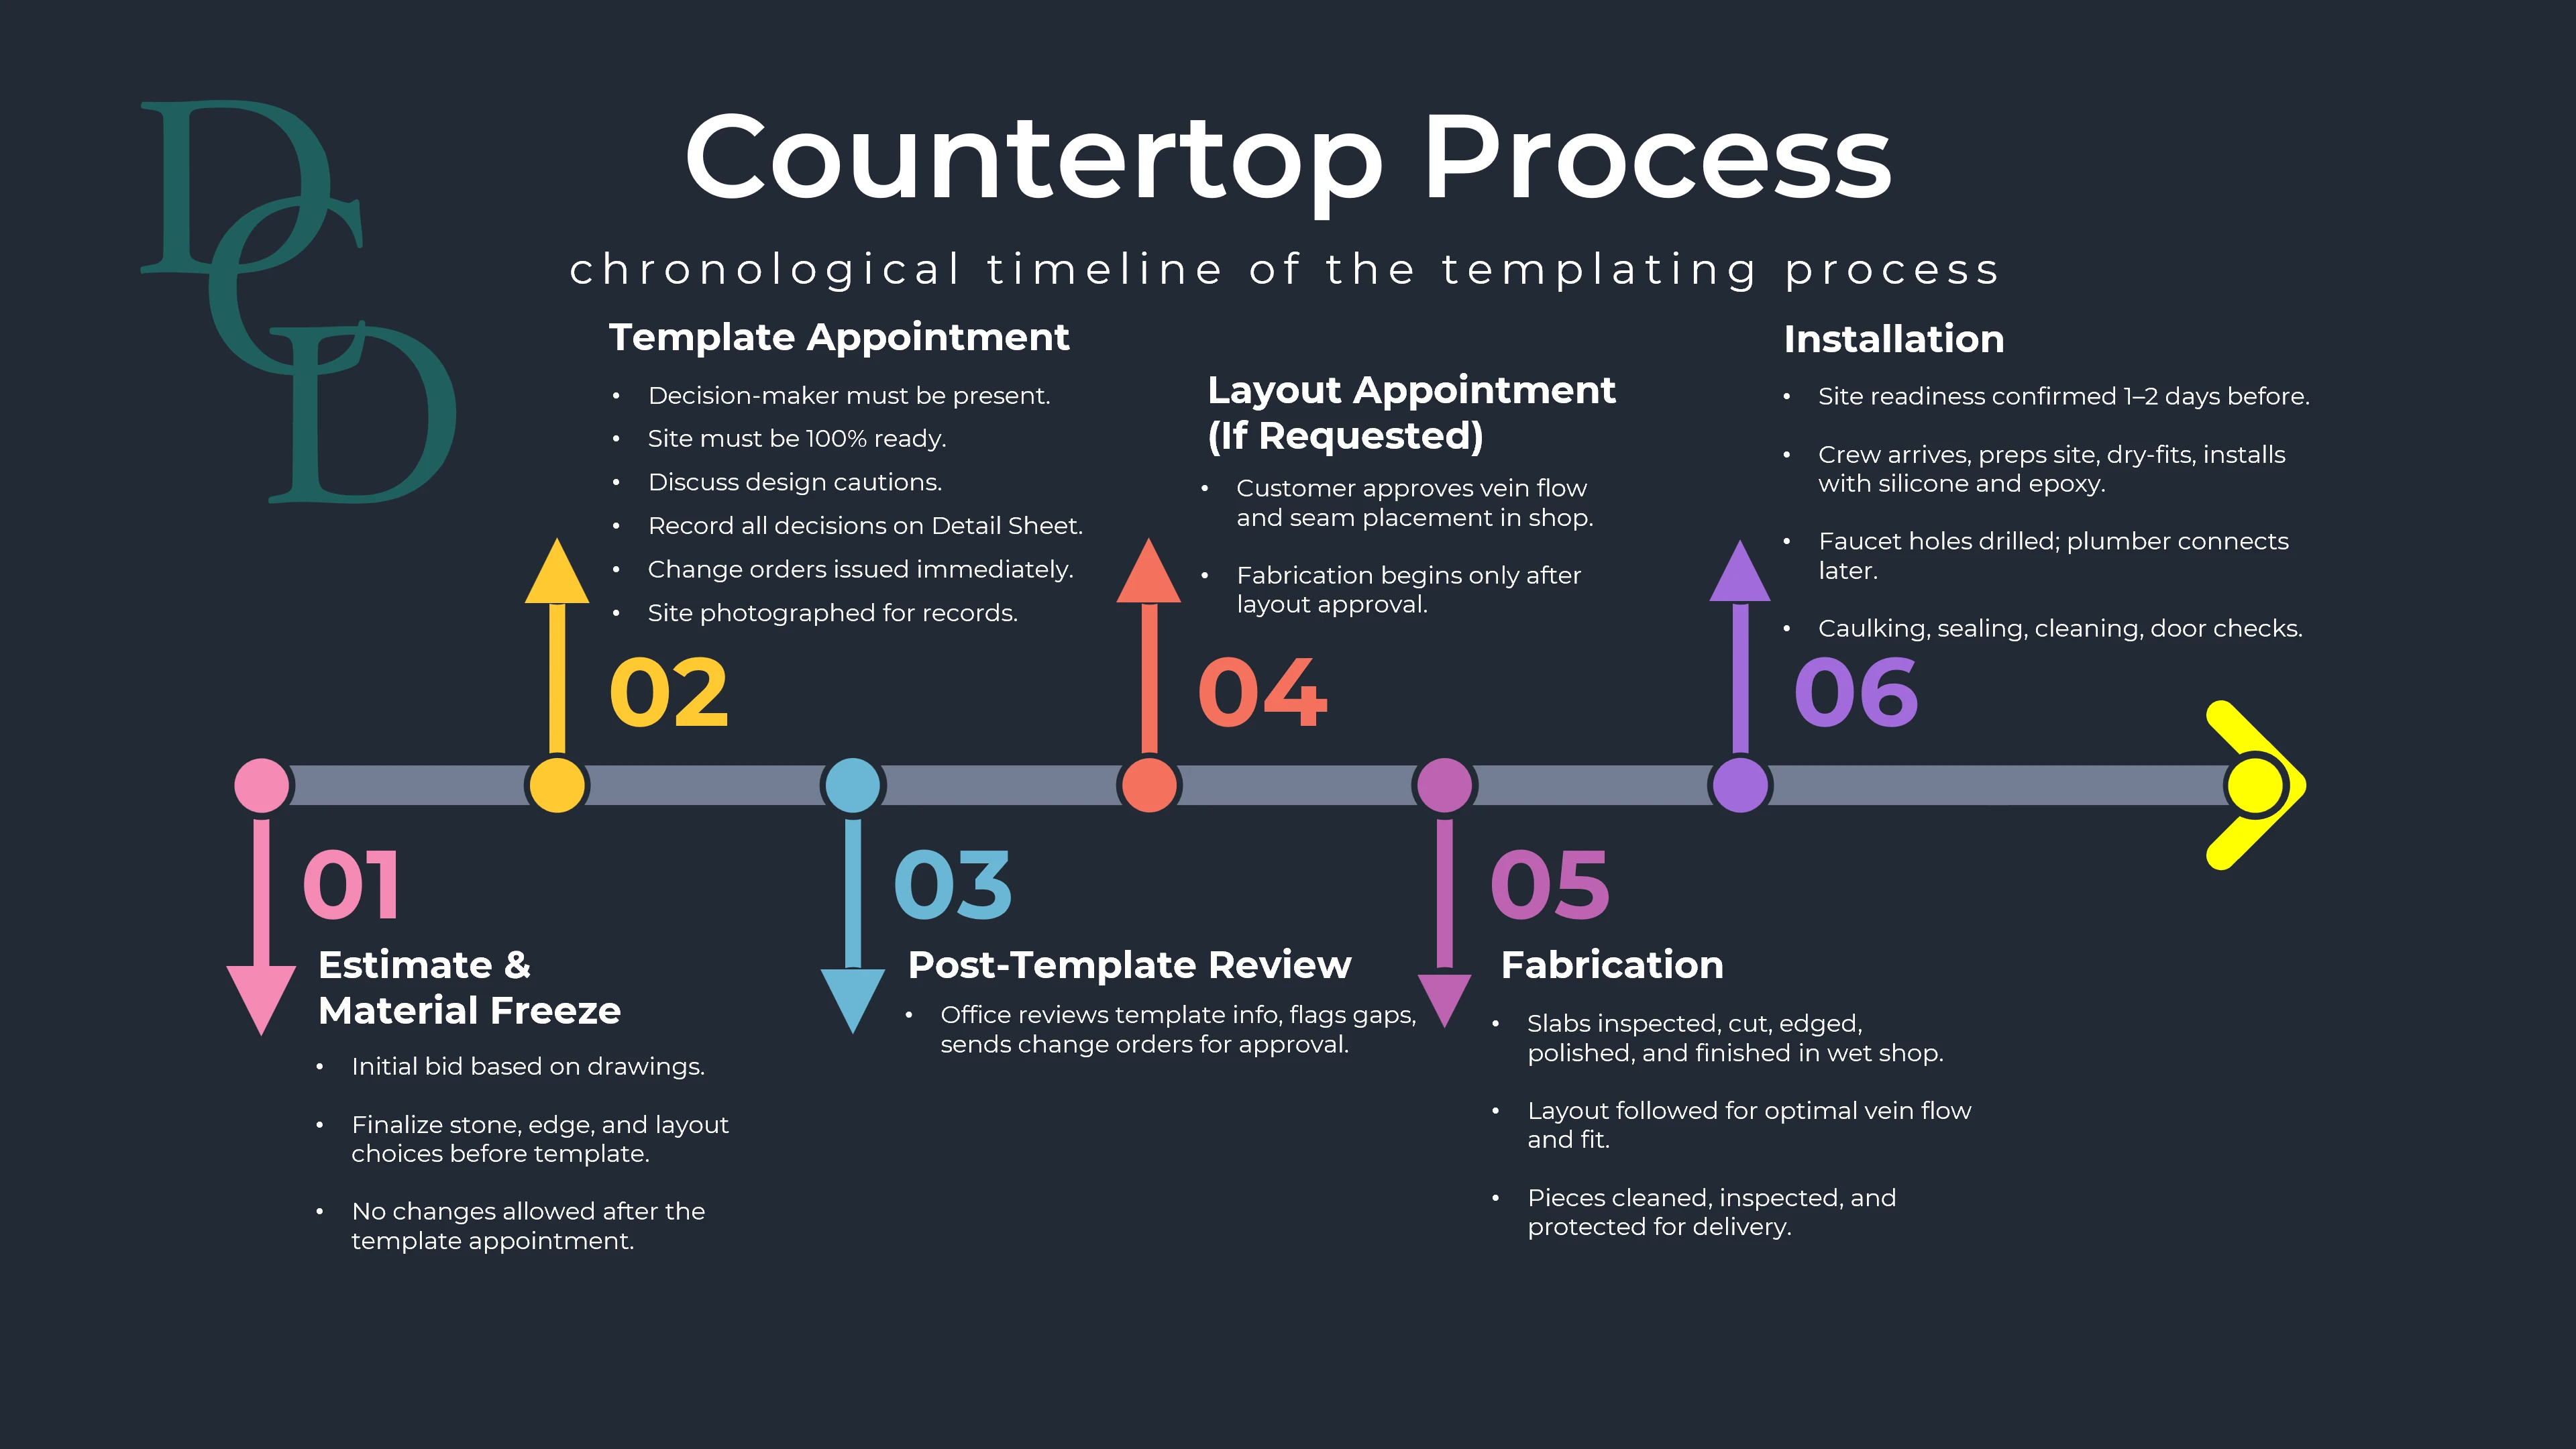
1. Estimate & Material Freeze
This stage locks in the job before any site work begins.Bids & Measurements
- DCD provides an initial estimate based on drawings and measurements.
- Price and square footage are provisional until verified at the template.
Stone Selection & Material Realities
Before the template appointment, the customer must:
- Make a material selection to allow us to finalize an accurate quote.
- Understand that natural stone (marble, granite, quartzite) contains pits, fissures, epoxy fills, subtle shading, and inconsistent sheen hard to detect when slabs are standing up and displayed under bright light.
- Recognize that quartz/engineered stone can show shading differences even within the same batch.
- Accept that DCD does not “fix,” resurface, or alter slab surfaces.
- Know that sealing natural stone slows absorption but does not make it stain-proof or waterproof.
- Review slab directionality and confirm they are satisfied with inherent variations.
- The size and quantity of slabs can limit design options. For the best visual result, allow for ample material and consider using book-matched slabs.
- If a crack or chip occurs during fabrication or installation, DCD will repair it to the best of its ability, but full replacement is not included.

Edge Selection
- Choose the countertop edge profile during this stage so it can be included in the final quote.
- Understand that some edges interact differently with textured or honed surfaces (e.g., bullnose or pencil edges may reveal texture differences).
- Final edge selection is documented with the material choice to avoid later changes.
- Choose your edge style here.
Material Freeze
- All materials and edges must be finalized at the template appointment.
- No changes can be made after the template appointment.
2. Template Appointment
Critical decision stage – everything recorded here drives fabrication.Scheduling
-
- Standard arrival time window: 9am – 11am or 1pm – 3pm
- DCD sends a reminder text 1–2 days prior; the template maker texts a precise arrival time the morning of the appointment.
- A knowledgeable decision-maker must be present. It is important that someone with intimate knowledge of the project be present for the template.
- A standard-size kitchen will typically take 2 hours to template.

DCD will try to catch potential mistakes or design problems at the template appointment but it is not the responsibility of the stone masons to ensure that other contractors have performed their tasks properly.
Site Readiness
Examples of NOT ready:
- Cabinets are not installed or still in boxes.
- Cabinets on either side of the range are not level.
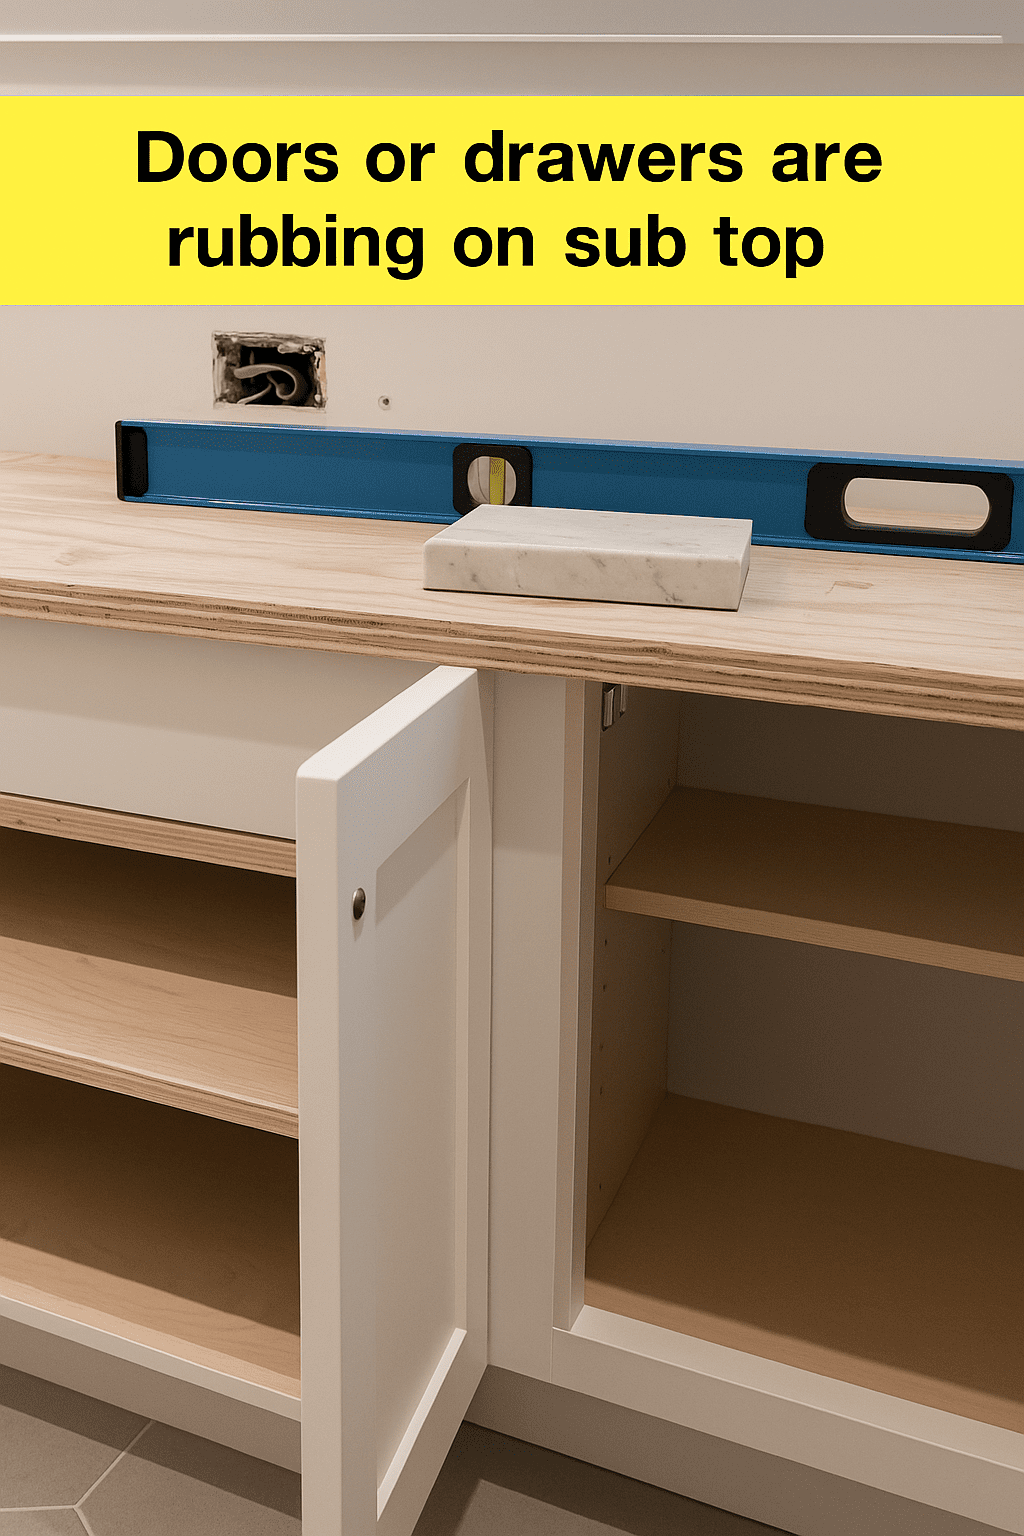
- Cabinet doors and drawers are rubbing on sub top.
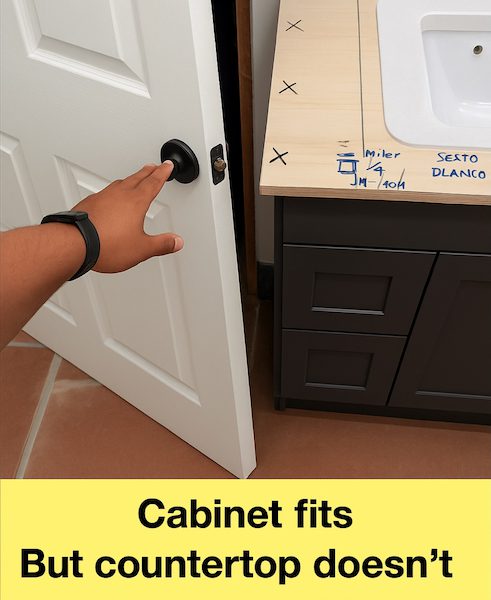
- Cabinets simply don’t fit.
- Sink is missing or not set in plywood
- Plywood is missing or improperly attached
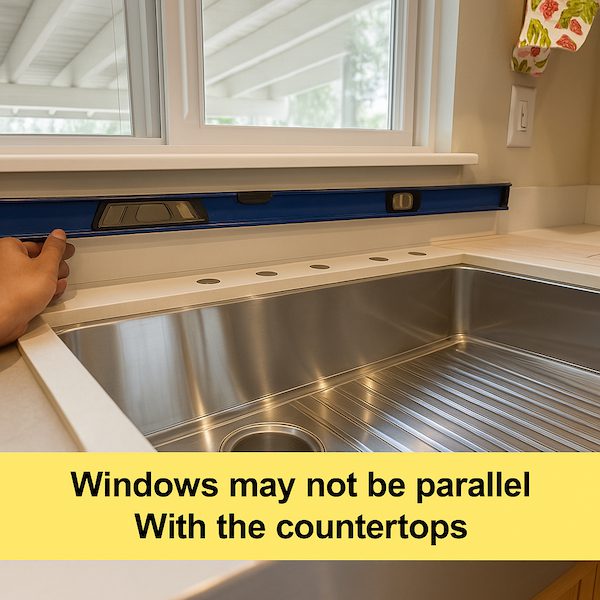
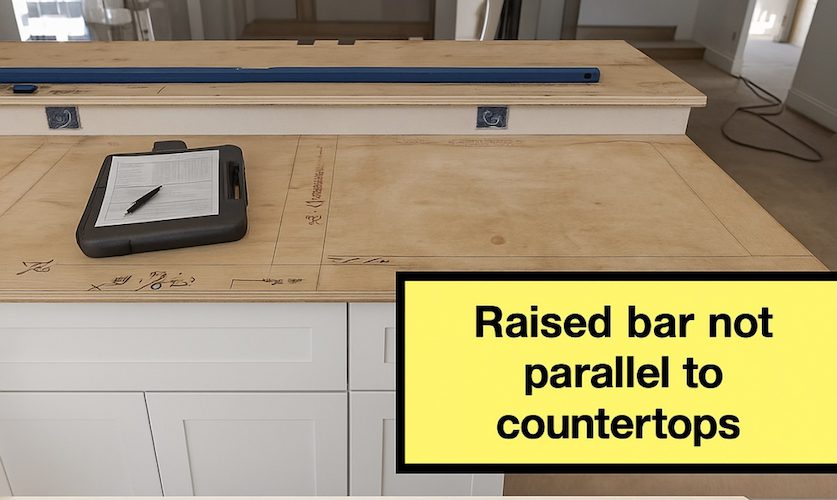
- Windows, garden windows, or raised bars may not be parallel or flush with the countertops.
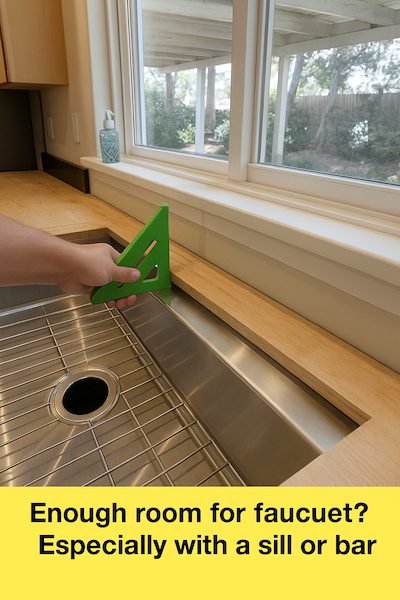
- Faucet clearance issues
- Island won’t physically fit in the house
•••A perfect job site is fully prepared for templating with everything installed, level, and unobstructed.
Here’s what “ready” looks like:- Cabinets – All base and upper cabinets are installed, square, level, and securely fastened. Doors and drawers open and close freely with no rubbing or interference with sub-tops.
- Sub-top/Plywood – Any required plywood or sub-tops are properly attached and flush with cabinet faces.
- Appliances & Fixtures – Sinks, faucets, and any cut-in items are on site and either installed or ready to set in place for measurements.
- Clearances – Windows, garden windows, raised bars, and walls are square and parallel with the countertop layout. Faucet clearances are confirmed.
- Access & Space – Pathways are clear and the countertop area is completely free of debris, tools, food, and temporary supports so templating can proceed without obstruction.
- Fit – The kitchen island and all components physically fit within the space with doors, walls, and passages accounted for.
In short: nothing is missing, nothing is out of level, and nothing is in the way—so the template can be made without adjustments, delays, or rework.
DCD Fabrication Inc. is known for tackling the most challenging and creative designs, giving its showroom and contractor partners the freedom to push their imagination. Along the way, the team has also learned which approaches are best avoided.
Design Cautions
Discuss these with the template maker and record decisions on the Detail Sheet:Highest Crack / Warranty Risks

- A cutout in stone with 90-degree corners is prone to cracking. DCD offers flush sink cutouts only for standard stainless-steel sinks with rounded (radius) corners, for an additional charge. Flush cutouts are not available for undermount sinks with square corners or for ceramic sinks, as ceramic edges can’t be made perfectly flush. Flush cooktops or sink cutouts can also leave small gaps that collect dirt and increase crack risk.
- One-piece backsplashes can’t wrap around a 90° corner. Stone can crack if you cut a perfect 90° inside corner, but rounding the cut for strength leaves a little gap where the cabinets meet. To avoid both the crack risk and the gap, the backsplash is cut into two pieces and seamed together at the corner for a tight, clean fit.
- L-shaped countertops with mitered edges are popular for their clean look, but all 90-degree corners must include a seam to avoid cracking. DCD can use a reinforced technique to reduce crack risk if a customer insists on a no-seam miter, but any cracking would not be covered under warranty. A laminated square edge with a radius corner is a safer alternative.
- Quartzite drain boards. DCD does not cut drain boards cut into any stone countertops. They are porous, hard to clean and void warranties.
Edge & Surface Considerations
- Textured surfaces with laminated edges (finish differences may be visible because the edge texture is hand-matched to the factory surface).
- The standard edge at a range, panel, or fridge is a single thickness. A thicker laminated edge will only be made if requested at the template appointment.
Structural & Template-Stage Adjustments
- The template maker may make recommendations like installing metal supports if an unsupported overhang exceeds 10”.
- If storage is below an overhang, the template maker may advise lowering doors or drawers to maintain at least 3/8″ clearance from the sub-top.
- Islands and cabinets with waterfall ends must be plumb and square. Waterfall ends will have a small 1/8″–3/16″ gap at the bottom to allow for expansion, settling, and shifting. Ideally the vertical edge of the waterfall is the same width as the finished edge of the countertop.
- The template maker may suggest adjusting the desired splash height either higher or lower to accommodate outlets or to hide wall damage.
Installation Sequencing & Site Prep
- Tile should be installed after the countertops. If tile must go in first, leave the last few rows unfinished until the countertops are installed.
- Do not use countertops as workbenches or ladders (hidden damage, no warranty).
- Allow the countertops to cure for 24 hours before starting any plumbing or tile work in the area.
Detail Sheet – The Fabrication Contract
- Every decision—edges, splash height, faucet holes, appliance edges, special requests, layout request—must be written on the Detail Sheet.
- The authorized onsite representative initials and signs it.
- A yellow carbon copy with the projected install date is left with the authorized onsite representative.
- Rule: If it is not on the Detail Sheet, it will not happen!
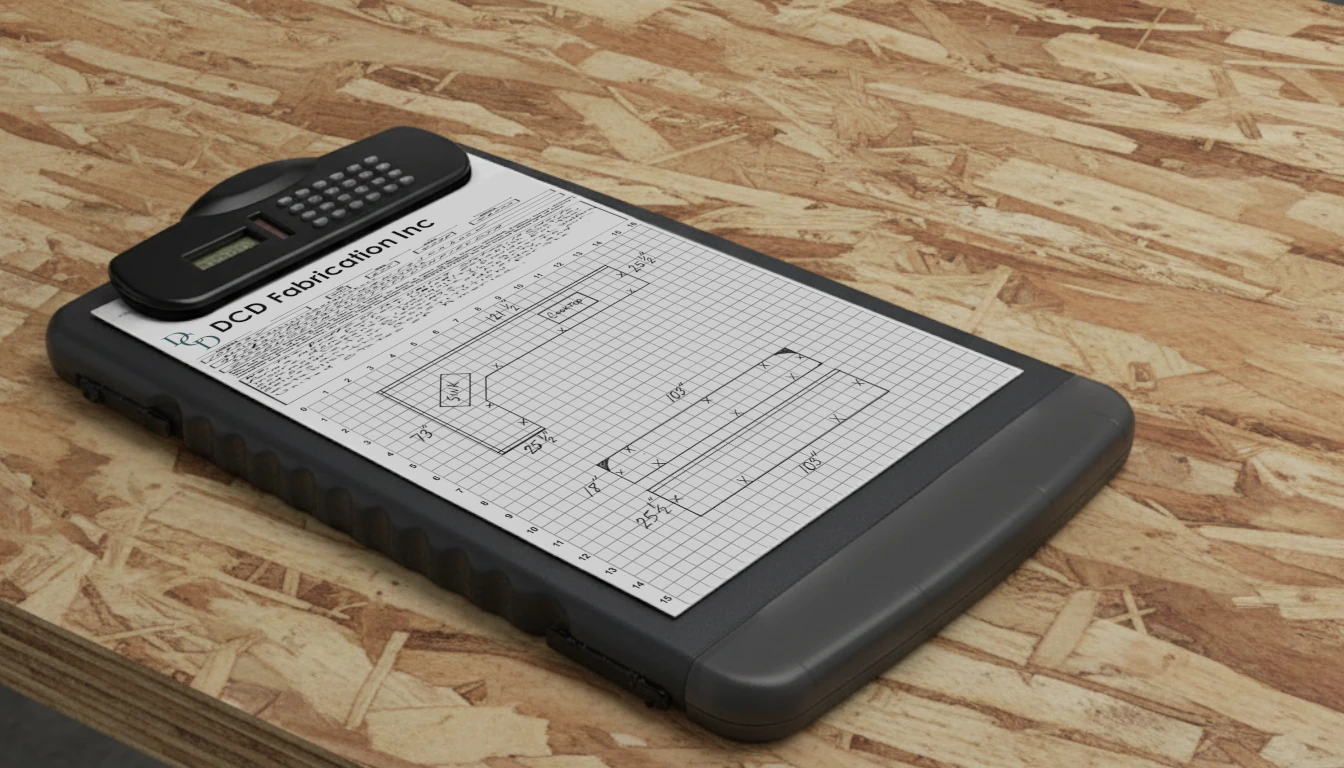
Layout Requests
- If a layout is desired to control vein direction or seam placement, the layout must be requested at template and recorded on the Detail Sheet.
- If no layout is specified, fabrication will proceed with a layout carefully planned by DCD staff, drawing on years of experience and best practices to create a balanced, visually pleasing result. Because the layout is finalized during fabrication, changes or second-guessing after completion cannot be accommodated.
- During fabrication DCD will make every effort to align veins across splashes and laminations and to maintain material flow throughout the job, even when splashes require multiple pieces.
Change Orders
- Any cost or scope changes identified during the template are issued as a change order immediately after the appointment.
- Change orders must be approved before fabrication begins.
Documentation
- Template maker photographs the site and completed template to record conditions and protect against damage claims. DCD will do its best to identify existing damage at the template appointment and before beginning the installation.
-
3. Post Template Review
Full team review to catch missing info and finalize change orders.- The next day, the template maker, office staff, and shop supervisor review the Detail Sheet, photos, and notes.
- Any missing information is flagged, and all change orders resulting from decisions made during the templating appointment are issued to the showroom or contractor for prompt approval to prevent delays.

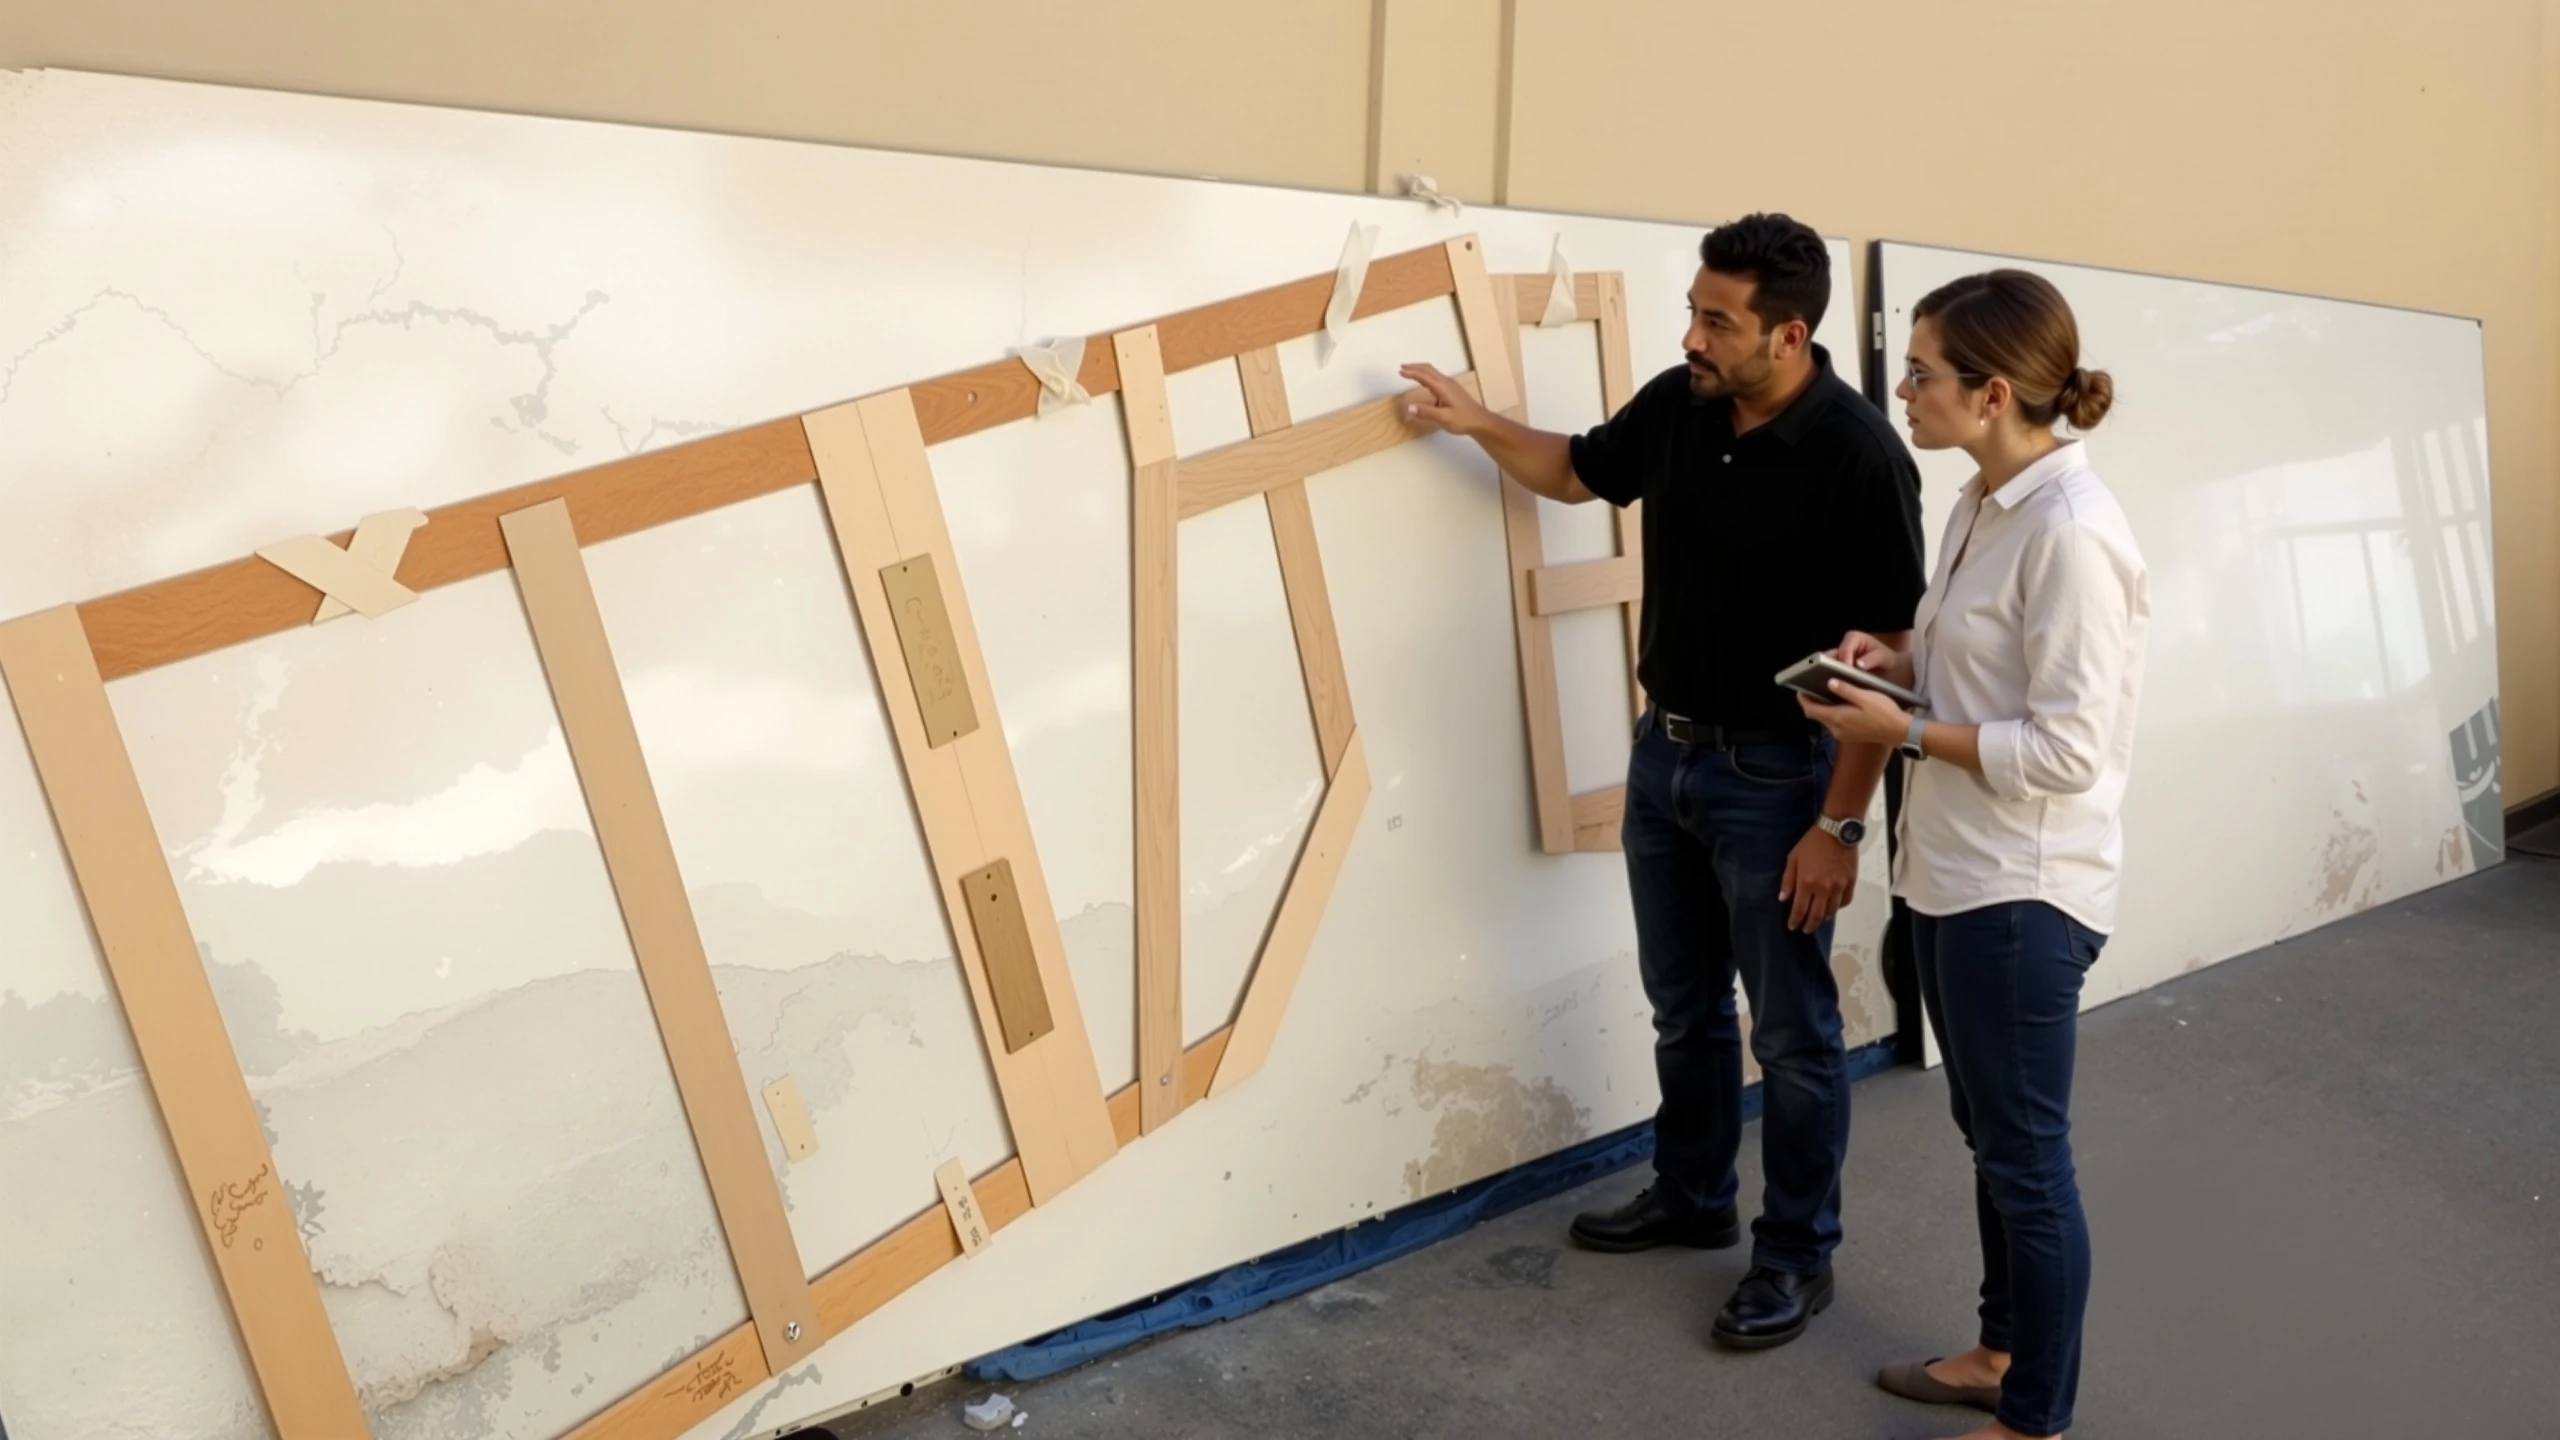
4. Layout Appointment
If requested on detail sheet during template appointment.The shop team lays out every job to preserve material flow and vein direction. This is especially challenging with materials that have bold veining or strong directionality, particularly in L- or U-shaped kitchens. A layout at our San Leandro shop allows the homeowner to visualize the finished product and helps set clear expectations.
- When slabs arrive, DCD contacts the customer to schedule the layout.
- Customer reviews slabs and approves vein flow, seam locations, and directional matching.
- DCD staff may use computer optimization or physical layouts to facilitate the layout process and minimize seam visibility.
- Fabrication cannot begin until the layout is complete.
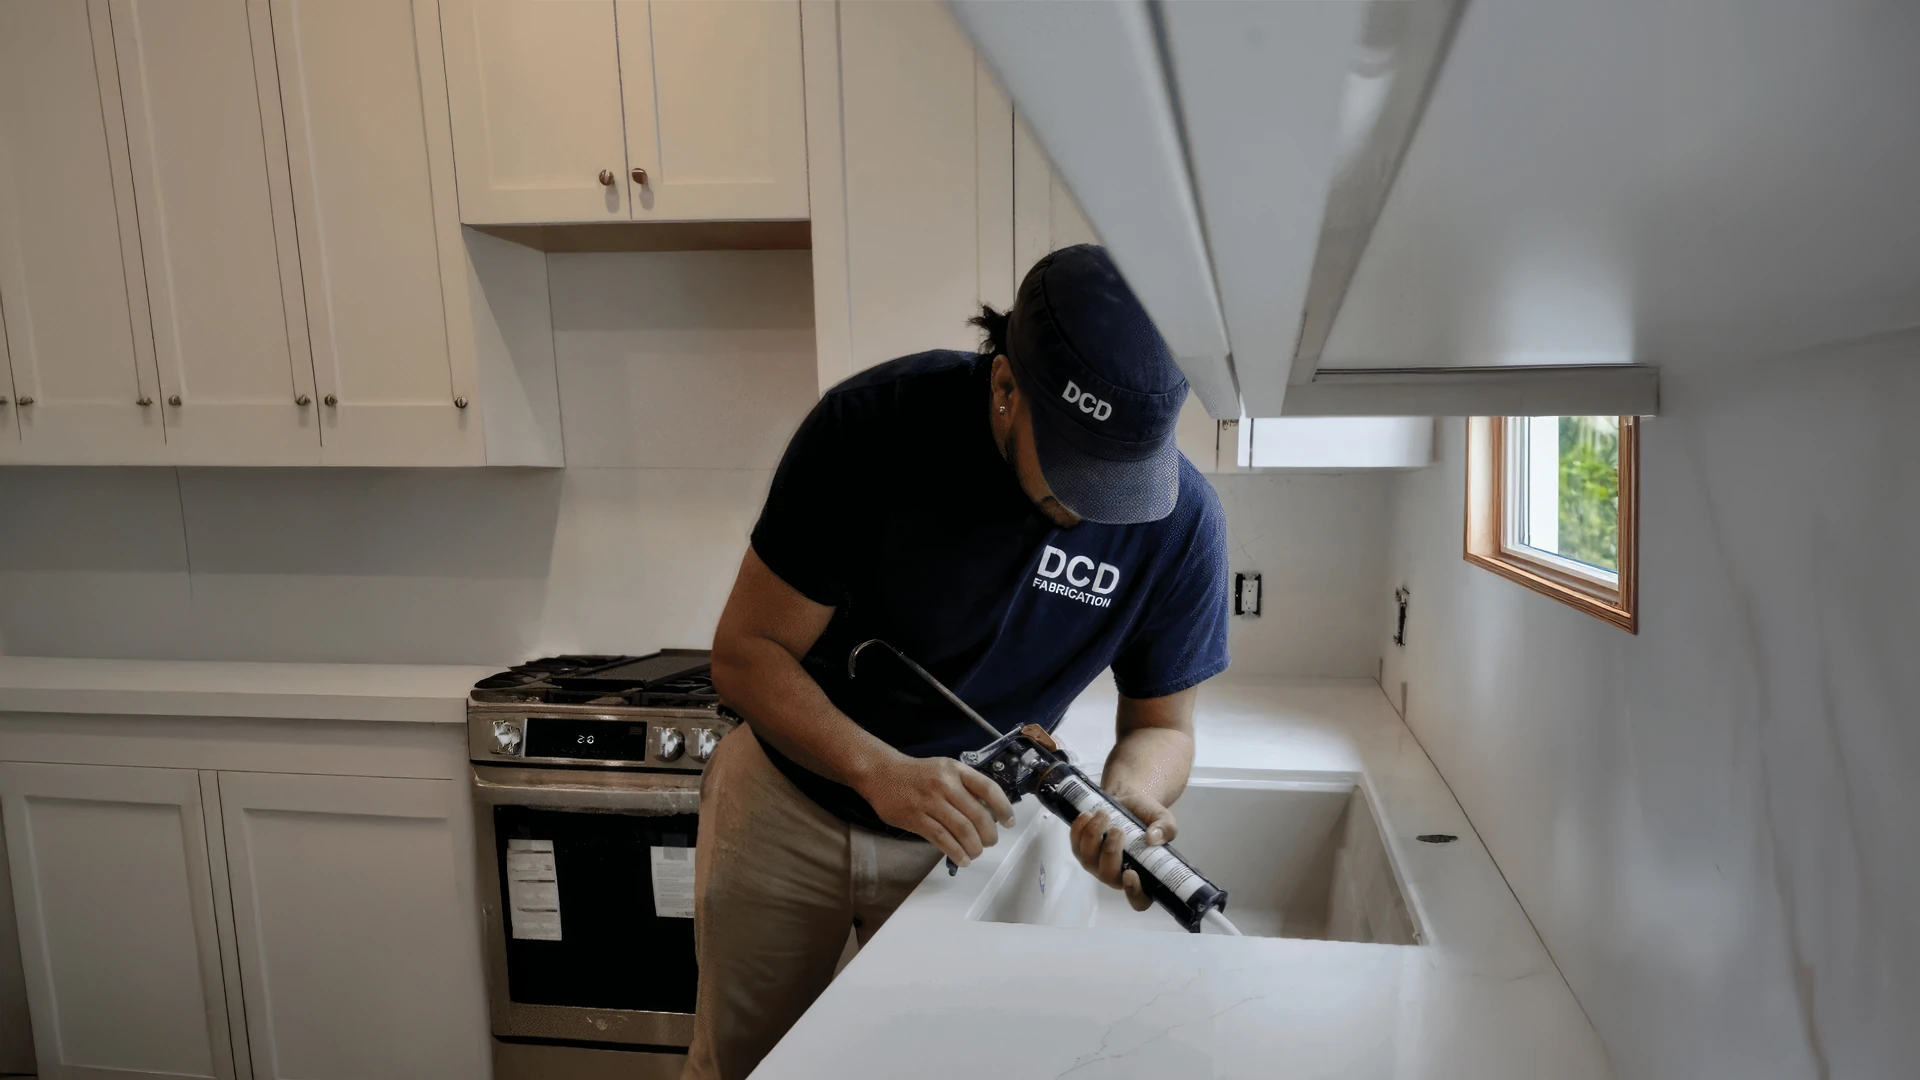
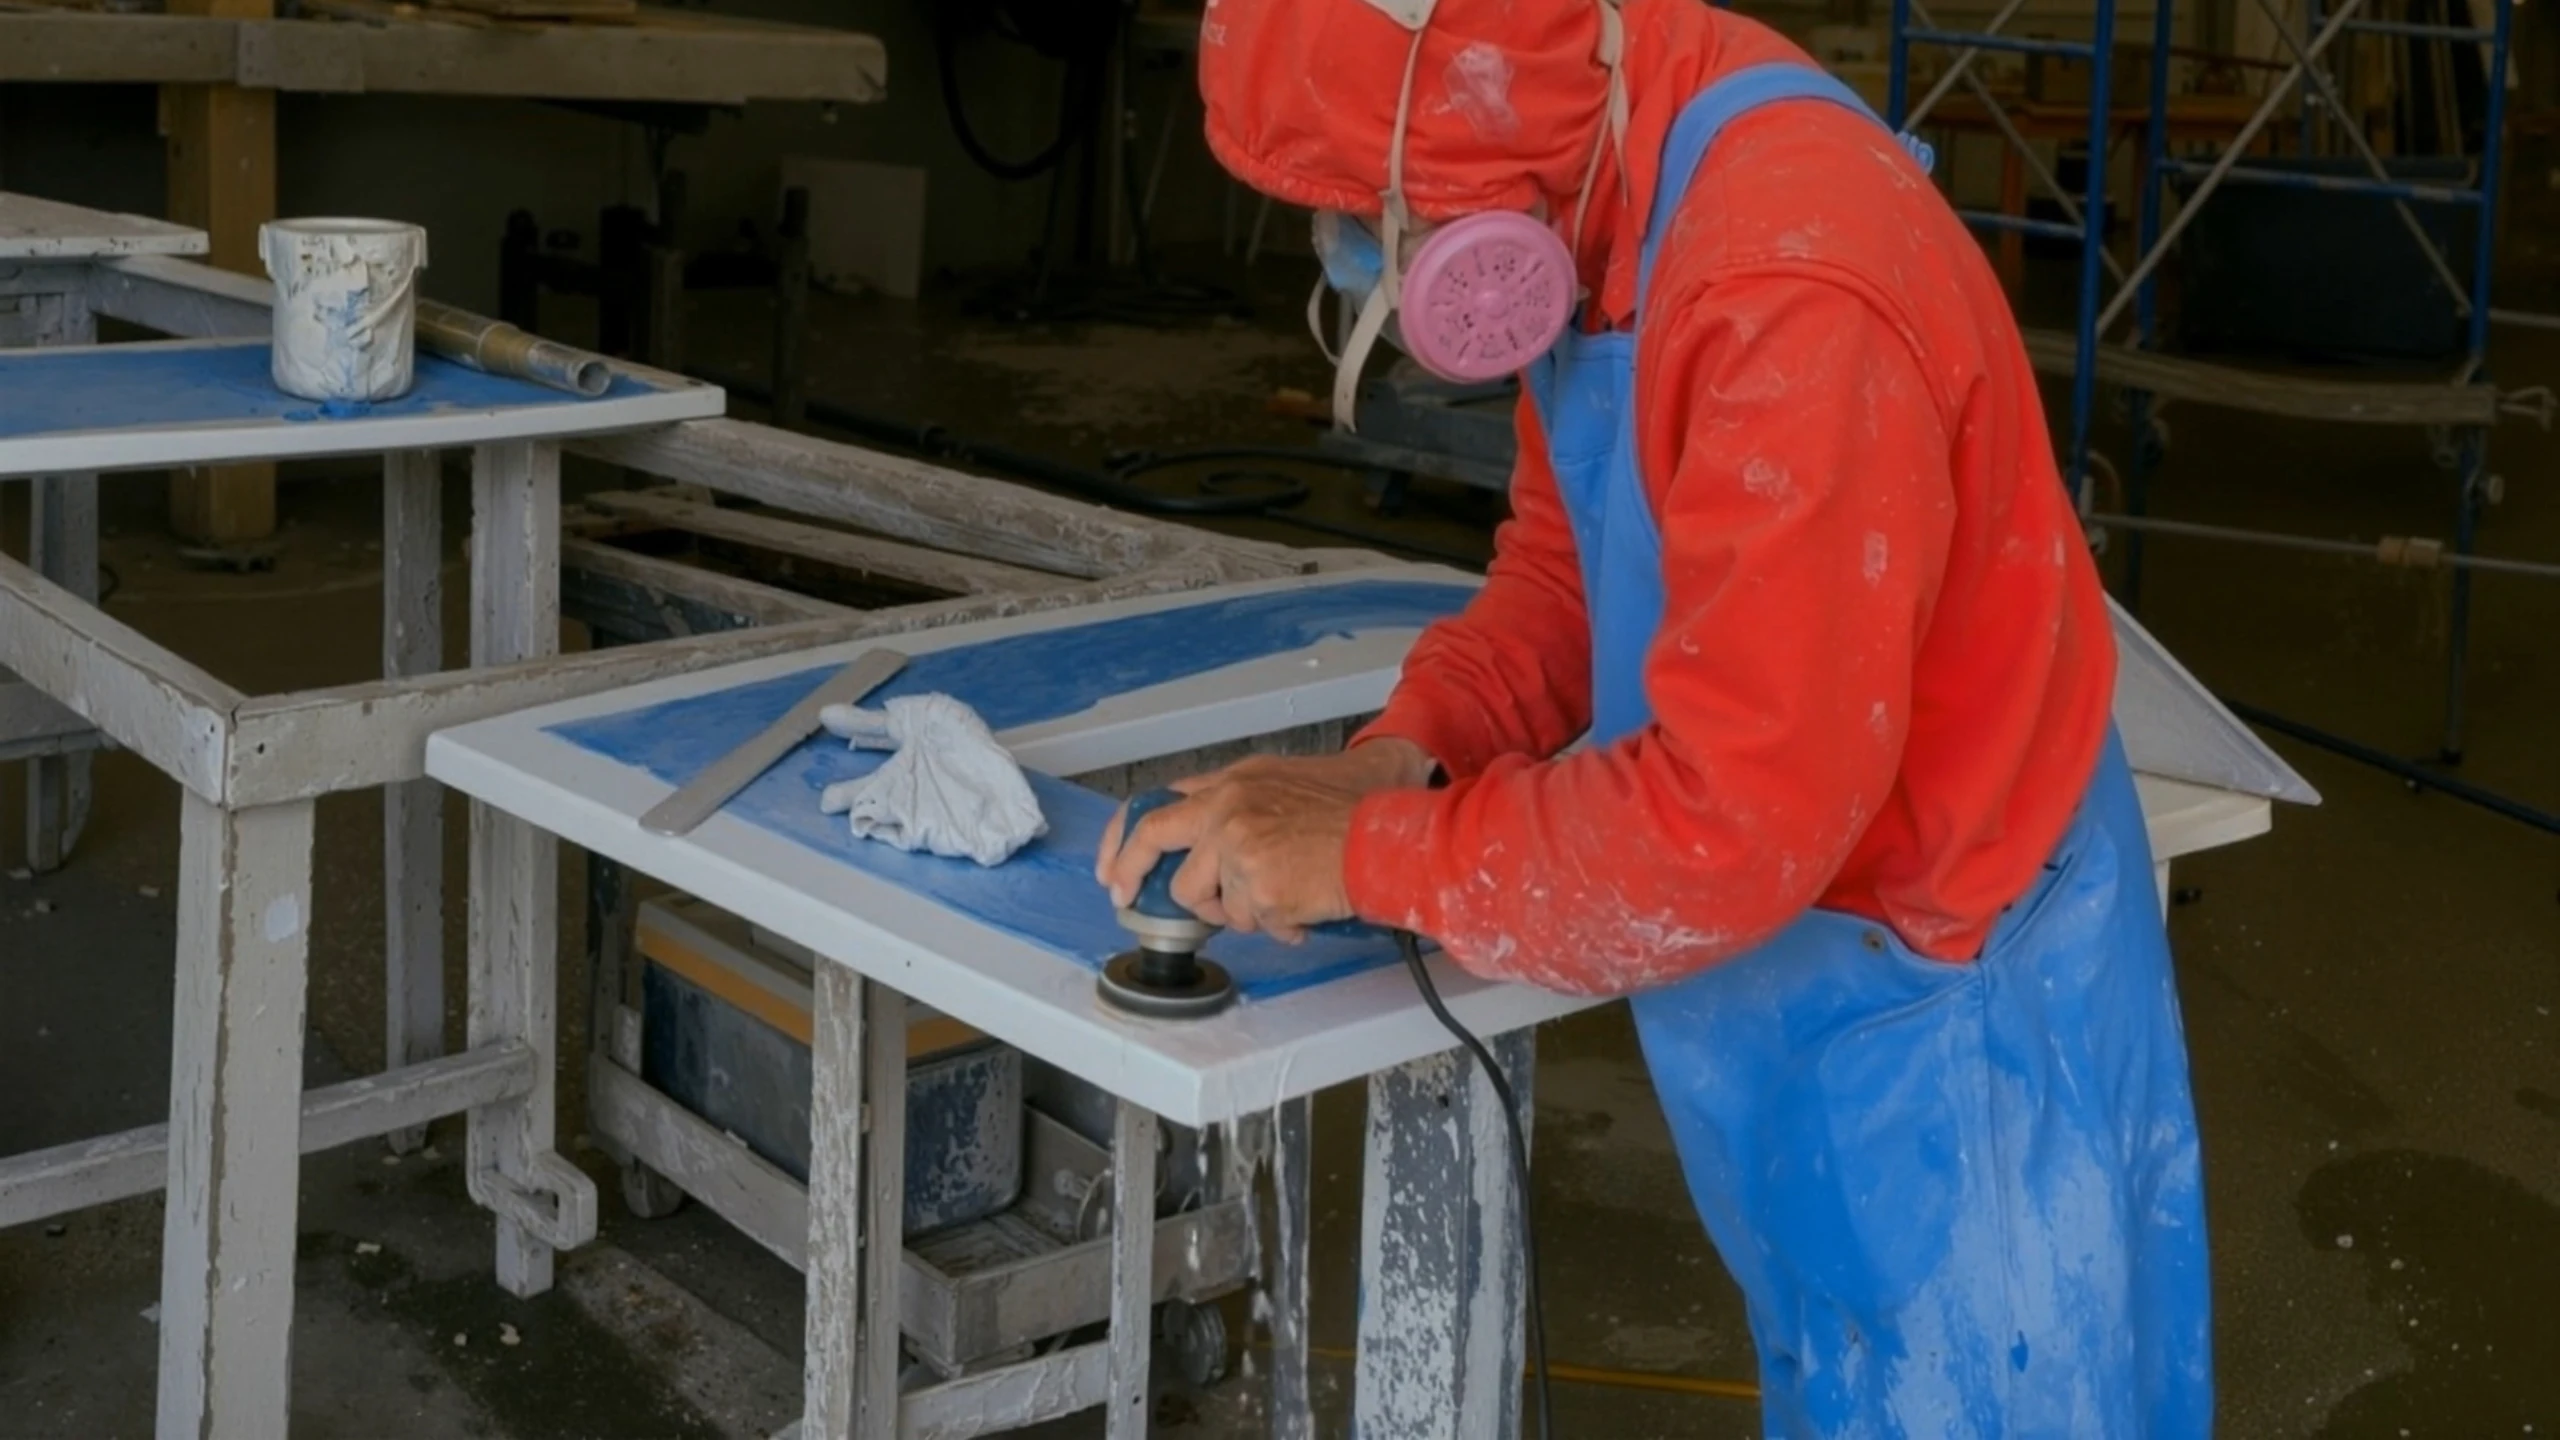
5. Fabrication
Precision stonework with a clean, safe, and sustainable approach.DCD Fabrication operates as a wet shop, using water throughout cutting and polishing to keep dust to a minimum and protect the health of the team. The closed-loop water recycling system reduces water usage and minimizes environmental impact, reflecting company’s commitment to a cleaner, safer, and more sustainable workplace.
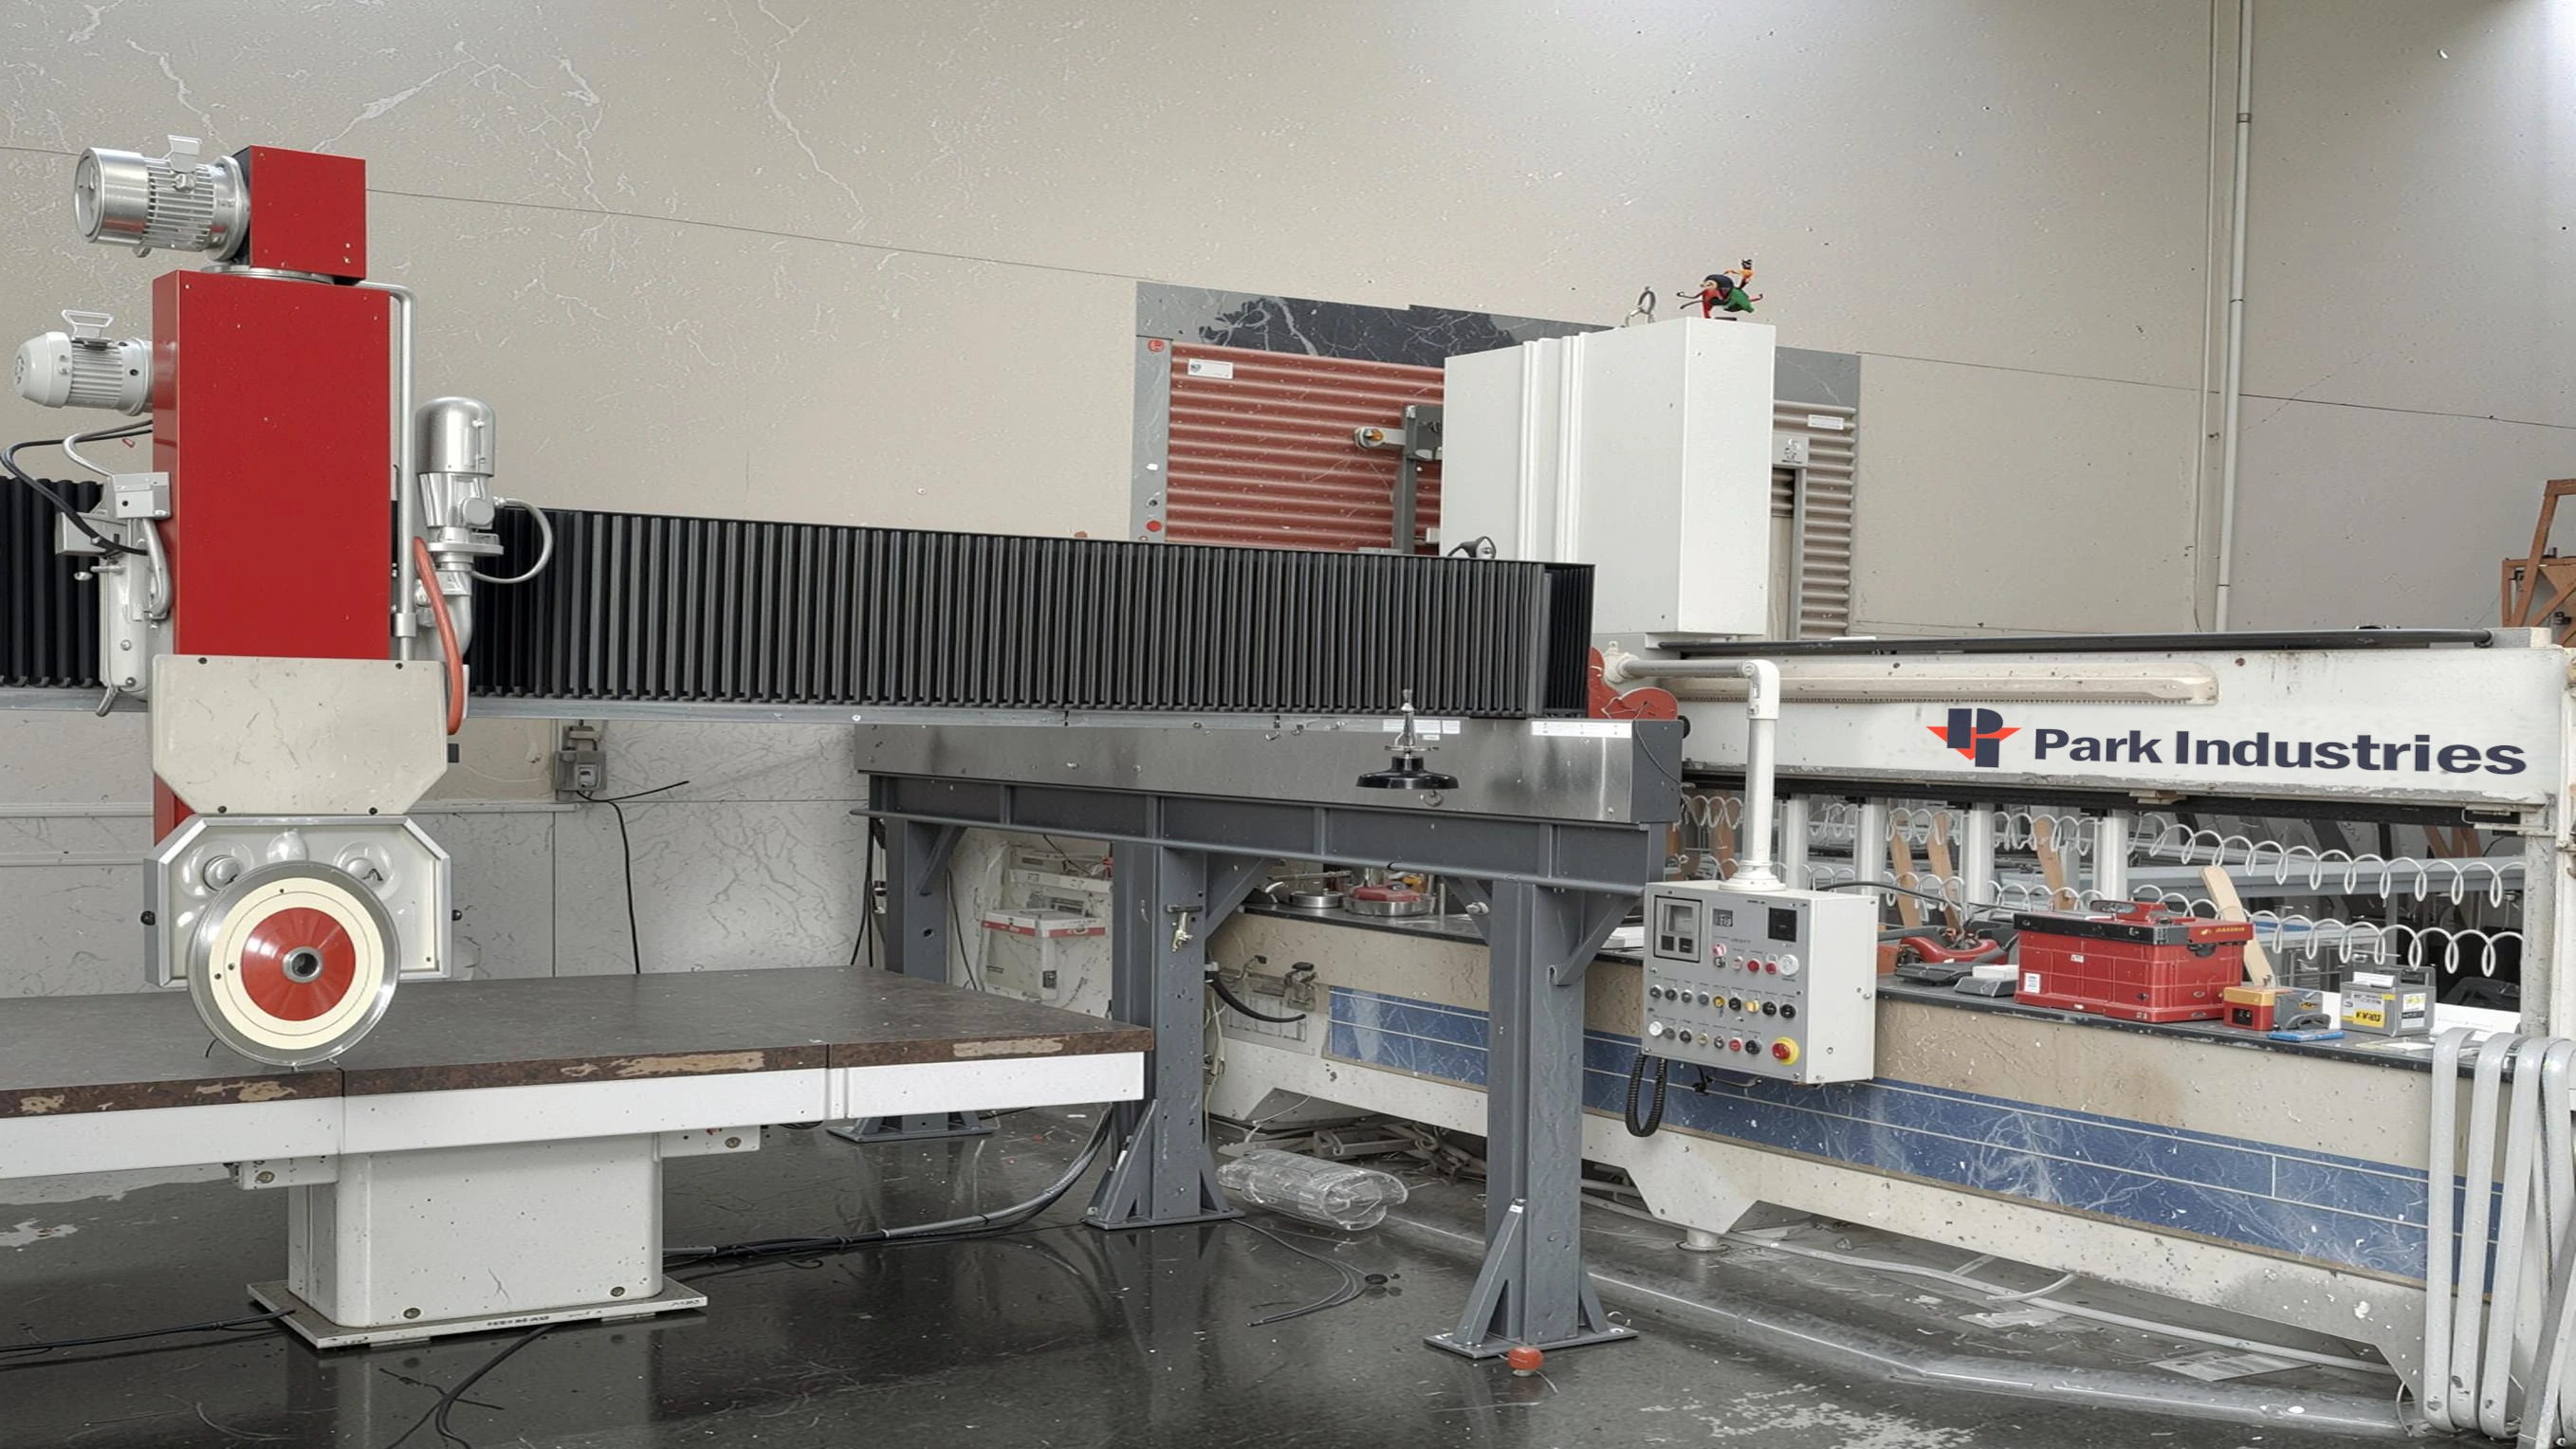
- DCD is a wet shop, using water for all cutting and polishing to reduce dust.
- Each slab is carefully inspected upon arrival. Protective film is removed for inspection, then reapplied to safeguard the surface as pieces move through the shop.
- Our team develops a detailed cut sheet to maximize material use and minimize shading issues, ensuring optimal color and vein flow across all pieces.
- Slabs are precisely cut on state-of-the-art bridge saws, then edges are attached with custom-mixed epoxy, shaped, and polished to the selected profile.
- Sink and appliance cutouts are cut and polished with specialized tooling for smooth, durable finishes.
- Every surface is hand-finished and refined to meet DCD’s high standards, including subtle touch-ups and seam preparation for a flawless final fit.
Before staging for installation, all countertops are thoroughly cleaned, inspected, and protected to ensure they arrive at the job site in excellent condition.
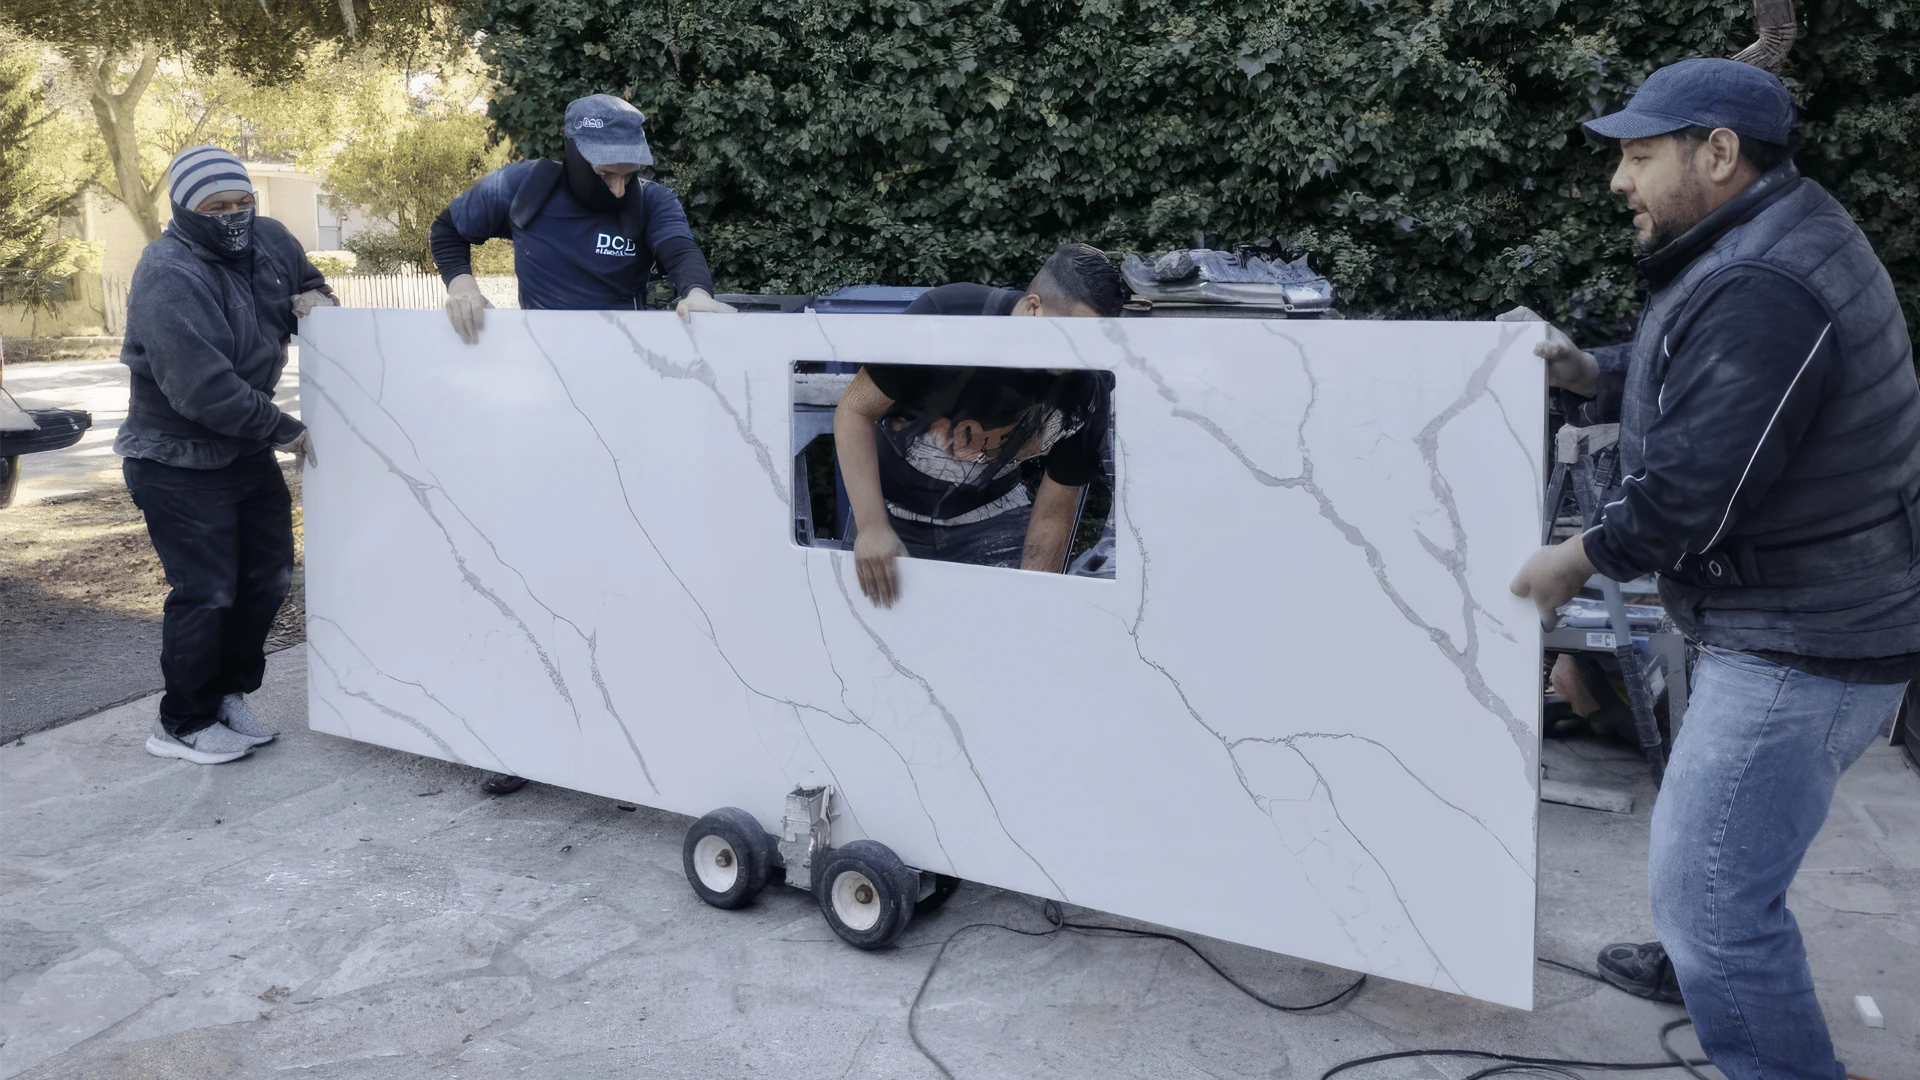
6. Installation
From site readiness to final sign-off, every step ensures a perfect fit.Pre-Arrival Confirmation
- A day or two before installation, DCD confirms that cabinets, appliances, plumbing, and site conditions are ready.
- The DCD install crew does not move ranges, refrigerators, or dishwashers. For the best fit, please have all appliances set in place before installation so countertops can be installed snugly against them.
- The countertop area should be free of debris, tools, food, appliances and the like.
- Unprepared sites may require rescheduling.
- Sink and accessory hole locations must be planned in advance and clearly communicated to the installer so they can be accurately noted on the diagram.
- Contractors who plan ahead will drill out or remove the plywood around the faucet area to make installation easier for the plumber.
Arrival & Preparation
- Standard arrival time window: 9am – 11am or 1pm – 3pm
- Crew sends a precise arrival text the morning of the appointment.
- Appliances should already be in place; DCD does not move ranges, fridges, or dishwashers.
- The installation crew will cone off their truck and work area as soon as they arrive.
- Before starting the installation, the crew will take photos of the area: including cabinets, floors, trim, and the sink to document existing conditions.
- Crew lays tarps for basic floor protection; extra protection (ram board) must be provided by others.
- Due to heavy stone, crew does not remove shoes or wear booties.
Installation Steps
- Dry Fit & Adjustments – Countertops are dry-fitted and any necessary grinding, cutting, or drilling is completed at this stage. Some work may need to be done inside the home, which can create dust. The installation crew will make every reasonable effort to minimize it by vacuuming as the dust is created.
- Once the fit is confirmed, a high-quality adhesive—typically 100% silicone—is applied to the sub-top to bond the countertop securely in place.
- Undermount sinks are secured with 100% silicone and caulked for a watertight seal.
- Seams are joined using a custom color-matched two-part epoxy, carefully minimizing visibility for a clean appearance. A seam setter is used to hold the countertops tightly together while the epoxy cures, ensuring a strong, even joint.
- Faucet holes drilled through stone only; plumber handles sub-top holes.
- Standard hole size: 1-3/8″.
- The standard spread for a vanity faucet requiring three holes is 8”.
- It is the responsibility of others to specify the number and placement of holes; the stone mason does not determine this.
- The faucet should be secured directly to the underside of the stone, not the plywood. For this reason, the hole in the plywood should be cut larger than the stone opening to allow proper tightening against the stone.
- Wait 24 hours before connecting plumbing.
Finishing Touches & Care
- Caulking: Applied at splash joints and countertop/wall interfaces.
- Cleaning & Sealing: Countertops are cleaned; natural stone is sealed (engineered stone and porcelain does not require sealing).
- Care Instructions: Stake installers provide recommended cleaning products and resealing intervals specific to the material. Sealing natural stone slows absorption but does not make it stain-proof or waterproof. Liquids like wine, tea, or coffee can still cause stains if left on the countertop.
- Door & Drawer Check: Verified to open freely; if rubbing occurs, cabinet adjustments or slight shimming may be needed.
- Customer Sign-Off: The onsite representative inspects and approves all work on the Completed Job Checklist.